My final images are now slotted into the relevant blogs with descriptions of why I chose them. I have loved the course again, just as I did in Level 1. The difference is now I feel I can handle the camera with more confidence. I really enjoyed my themes and know they were the right choices.
I have learned such a lot. You don't realise how much you will learn at the beginning, until the end when you analyse it all. Now I need to put it into practise, get out there to gain the experience, and no doubt learn a lot more. I am pleased I managed to use more photoshop and understand masking techniques, which I didn't find easy to master at first.
Highlights of the course for me would be the Photo Imaging Exibition, the day out to Matlock Bath/Lumsdale falls and their images, achieving 'the Dreamy', and getting my images on the college exibition tv's and website.
With many thanks to Steve, who has been great, really supportive and encouraging me to think beyond the trees, which I am grateful for. Thank you very much for the kind comments - I am over the moon with the results. I will continue to try to paint with light...
And I hope to keep in touch with such a great group of people.
Thursday, 7 July 2011
Sunday, 3 July 2011
Folio of final images- Digital Image Manipulation
Assignment 215:
 Bee Flower
 Scarlett glow
 Fantasy brook
 High Rose
 Mossey log
 Flowery stump


Folio of final images- Theme 2
Theme 2 - The Closer View:
 The dreamy
shutter1/200 aperture f.40 iso 100 Fl105mm
 Tree tongue
shutter 1/8 sec aperture f22 iso 100 Fl 105mm
 Flower spikes
shutter 1/100 aperture f.40 iso 100 Fl 105mm
 Curling
shutter 1/80 aperture f4.0 iso 100 Fl 105mm
 Tree legs
shutter 1/40 aperture f7.1 iso 200 Fl 24mm
 Lit leaves
shutter 1/20 sec aperture f4.0 iso 100 Fl 105mm
 Maze of flowers
shutter 1/250 aperture f4.0 iso 100 Fl105mm
 Open poppy
shutter 1/200 aperture f4.0 iso 100 Fl 105mm
 Blue and green crowns
shutter 1/80 aperture f4.0 iso 100 Fl 105mm
 Rain drops
shutter 1.6 sec aperture f4.0 iso 100 FL 105mm

shutter1/200 aperture f.40 iso 100 Fl105mm

shutter 1/8 sec aperture f22 iso 100 Fl 105mm

shutter 1/100 aperture f.40 iso 100 Fl 105mm

shutter 1/80 aperture f4.0 iso 100 Fl 105mm

shutter 1/40 aperture f7.1 iso 200 Fl 24mm

shutter 1/20 sec aperture f4.0 iso 100 Fl 105mm

shutter 1/250 aperture f4.0 iso 100 Fl105mm

shutter 1/200 aperture f4.0 iso 100 Fl 105mm

shutter 1/80 aperture f4.0 iso 100 Fl 105mm

shutter 1.6 sec aperture f4.0 iso 100 FL 105mm
Folio of final images- Theme 1
Theme 1 - Its Only Nature:
 Liquid Motion
shutter 0.6 sec aperture f14 iso 100 Fl 28mm
 Alive 2
shutter 1/640 aperture f7.1 iso 200 Fl 24mm
 Left Behind
shutter 1/25 aperture f7.1 iso 200 Fl 40mm
 Sandwich
shutter 1/1328 sec aperture f4.0 iso 100 Fl 105mm
 Water faces
shutter 1/50 aperture f9 iso 200 Fl 105mm
 Sunset Silhouette
shutter 1/500 aperture f7.1 iso 200 Fl 105mm
 Magic wand
shutter 1/8 sec aperture f14 iso 100 Fl 88mm
 Bluebell wood
shutter 1/160 aperture f4.0 iso 200 Fl 80mm

 Tree world
shutter 1/200 aperture f7.1 iso 200 Fl 24mm

shutter 0.6 sec aperture f14 iso 100 Fl 28mm

shutter 1/640 aperture f7.1 iso 200 Fl 24mm

shutter 1/25 aperture f7.1 iso 200 Fl 40mm

shutter 1/1328 sec aperture f4.0 iso 100 Fl 105mm

shutter 1/50 aperture f9 iso 200 Fl 105mm

shutter 1/500 aperture f7.1 iso 200 Fl 105mm

shutter 1/8 sec aperture f14 iso 100 Fl 88mm

shutter 1/160 aperture f4.0 iso 200 Fl 80mm

Stretch
shutter 1/1328 sec aperture f4.0 iso 200 Fl 102mm
shutter 1/200 aperture f7.1 iso 200 Fl 24mm
Sunday, 26 June 2011
Digital Manipulation - Masking and Selection
Painting a quick mask to make a detailed selection:-
My last attempt was to use the quick mask mode again using one image:-
 shutter 1/400 aperture f4.0 iso 200 FL35mm
This was my original image, taken at Calke Park (see Tree Story), in which I wanted to show the root detail of a tree. The background was a bit distracting however with a lot going on which was detracting the eye from the main subject. The light was not best placed either because I had caught the tree part in shadow, so its colours and textures were not fully shown.
I placed the image in photoshop and did layer, duplicate layer.

I ensured the default colours icon for foreground and background were set to black and white respectively. Then I hit the quick mask icon at the bottom of the tool palette (this paints in red) and chose a hard brush, and size, to paint on the red mask. I wanted to paint the mask over the main tree root subject in order to protect it from my amendments:
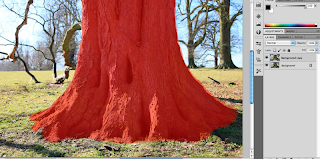 I used the left bracket to reduce my brush size when I got to nearer the edges and used the looking glass tool to zoom in to see how near the edges I was getting.
 Then I hit the quick mask took again and this sets the selection with the 'marching ants'. Now the tree content is protected and any amendments will affect the background and foreground only. I decided to use the Lens Blur filter (filter, blur, lens blur) to blur out the other areas to full extent.
 When the adjustments box came up I experimented with the sliders and increased the blade curvature to 61 and radius (which controls the blur extent) to 96. These gave the background a good blur and the foreground a water wave like effect lapping up towards the forefront tree root centre. It also gave a 3D sort of effect to the left roots of the tree. I accepted these adjustments with 'ok'.
 That was the background and foreground sorted but the main subject could do with adjustments too I thought, so I did select and inverse and this would give me the tree itself. I now looked at the brightness/contrast and saturation levels and adjusted them to what I saw fit, with an increase to each.


The above shows the history box of adjustments carried out. I then flattened the image and saved it as a jpg for showing on my blog.
 Down below
This end result really shows what I set out to take in camera...the base and root of a tree with its colours, textures, form, shape, lines and pattern. The eye is now drawn to the main subject first, and its habitat secondary.
I did later wonder if I should have included the foreground area (at the foot of the tree) in the mask, therefore protecting it from the blur... so the tree root didn't look quite so 'plonked on', but I had enjoyed experimenting with my first thoughts and liked the effects created.
My last attempt was to use the quick mask mode again using one image:-

This was my original image, taken at Calke Park (see Tree Story), in which I wanted to show the root detail of a tree. The background was a bit distracting however with a lot going on which was detracting the eye from the main subject. The light was not best placed either because I had caught the tree part in shadow, so its colours and textures were not fully shown.
I placed the image in photoshop and did layer, duplicate layer.

I ensured the default colours icon for foreground and background were set to black and white respectively. Then I hit the quick mask icon at the bottom of the tool palette (this paints in red) and chose a hard brush, and size, to paint on the red mask. I wanted to paint the mask over the main tree root subject in order to protect it from my amendments:


The above shows the history box of adjustments carried out. I then flattened the image and saved it as a jpg for showing on my blog.

This end result really shows what I set out to take in camera...the base and root of a tree with its colours, textures, form, shape, lines and pattern. The eye is now drawn to the main subject first, and its habitat secondary.
I did later wonder if I should have included the foreground area (at the foot of the tree) in the mask, therefore protecting it from the blur... so the tree root didn't look quite so 'plonked on', but I had enjoyed experimenting with my first thoughts and liked the effects created.
Digital Manipulation - Masking and Selection
I had another go at masking and selection using the mask icon within the layers palette this time and 2 different images:
 shutter 1/80 aperture f.4 iso 100 FL 105mm
 Looking in
shutter 1/320 aperture f7.1 iso 200 FL 24mm
I took 'Looking in' on one of my Calke park trips and the flower image on the way home from there in someone's garden. I was drawn to Looking in because of the pattern formation in the shadows of the foreground. It looks like shadows at the foot of the trees form a pair of spectacles so my idea was to put a flower in each part of the frame...to look at the view with rose tinted glasses. I used this flower, rather than one of my actual rose images because I thought its full big shape was better to act as the eyes.
The following screen grabs give examples of my process:

I placed both images in photoshop and moved the flower image to one side to look at them both. I copied the background layer. I planned to remove most of the green background from the flower image, once I had given it a rough cut out and in thinking this, I knew it would be more important when it was placed in the left spectacle frame (which was on the tree trunk) more than the right one, because the right part of the frame was on the floor where patches of green grass would let it mix in.

I set about cutting the flower out using the lasso tool and did edit, copy, to copy this selection.

Then I opened the scene image and did edit paste.

I clicked on the mask icon in the layers palette at this stage then did transform scale to resize the flower (by dragging in the top right corner of the box that appears) to make it smaller:


At this same time I also needed to remove the green from around my rough cut out of the flower. I selected the brush tool and set a size of 20px and opacity of 85% and ensured black was set as the foreground colour. Then I brushed around the edge of the flower to remove the unwanted green. As I did so I changed the brush to smaller to get into the intricate parts more. If I went too far and cut out abit of the flower it was ok because I had plenty of flower to play with, but if I made a big mistake and took a big part of it out, I could hit x (to revert to white as the foreground colour) and brush back over it to bring it back, then hit x to continue. I did not need to do this however because where I did take the odd tip off I simply rounded its edge to blend in.
 I zoomed into the flower to make the brushing easier (by cmd +)

 I used the move tool to place the flower in position in the left hand part of the spectacles and continued to resize down to fit easily within the frame. I thought the flower would look better rotated round slightly so did edit, transform rotate to turn it.

 Now it was looking more eye like, I needed to use the brush tool again to paint it into the other part of the frame using the same method outlined in my previous Digital Masking and Selection blog. (see Digital Masking and selection).
 Once I had done this I could move both the eyes together to position them as I saw fit, between the frames.


This was ok and as I had thought the green around the flower that I had brushed into the second eye blended into the scene because of the grass, but the eyes didn't really stand out enough. I saved the image as a psd and a jpg, so that I could then go back into the psd to carry out more amendments:

I returned and opened the 'psd' in order to make the eyes stand out more because I didn't want it to look like the flowers were just plonked on and part of the whole scene... They needed more defining to make them stand out so I increased the brightness slider to its maximum. This only affected the eye areas, because of the mask, and not the rest of the image.
 By un- ticking the preview box I was able to compare the before and after look to check... Yes the eyes did stand out more on full brightness.
 The above shows the history box.


I concluded that the white that now appeared around the flower eyes was fine because the background of eyes are white anyway. I think the lightening of the flowers make them appear more like roses and I am satisfied with the final result because it achieved what I set out to do...to create a look of rose spectacles looking into a nature scene, so I flattened the image (layer flatten image) and saved as a jpg.


shutter 1/320 aperture f7.1 iso 200 FL 24mm
I took 'Looking in' on one of my Calke park trips and the flower image on the way home from there in someone's garden. I was drawn to Looking in because of the pattern formation in the shadows of the foreground. It looks like shadows at the foot of the trees form a pair of spectacles so my idea was to put a flower in each part of the frame...to look at the view with rose tinted glasses. I used this flower, rather than one of my actual rose images because I thought its full big shape was better to act as the eyes.
The following screen grabs give examples of my process:

I placed both images in photoshop and moved the flower image to one side to look at them both. I copied the background layer. I planned to remove most of the green background from the flower image, once I had given it a rough cut out and in thinking this, I knew it would be more important when it was placed in the left spectacle frame (which was on the tree trunk) more than the right one, because the right part of the frame was on the floor where patches of green grass would let it mix in.

I set about cutting the flower out using the lasso tool and did edit, copy, to copy this selection.

Then I opened the scene image and did edit paste.

I clicked on the mask icon in the layers palette at this stage then did transform scale to resize the flower (by dragging in the top right corner of the box that appears) to make it smaller:


At this same time I also needed to remove the green from around my rough cut out of the flower. I selected the brush tool and set a size of 20px and opacity of 85% and ensured black was set as the foreground colour. Then I brushed around the edge of the flower to remove the unwanted green. As I did so I changed the brush to smaller to get into the intricate parts more. If I went too far and cut out abit of the flower it was ok because I had plenty of flower to play with, but if I made a big mistake and took a big part of it out, I could hit x (to revert to white as the foreground colour) and brush back over it to bring it back, then hit x to continue. I did not need to do this however because where I did take the odd tip off I simply rounded its edge to blend in.


This was ok and as I had thought the green around the flower that I had brushed into the second eye blended into the scene because of the grass, but the eyes didn't really stand out enough. I saved the image as a psd and a jpg, so that I could then go back into the psd to carry out more amendments:

I returned and opened the 'psd' in order to make the eyes stand out more because I didn't want it to look like the flowers were just plonked on and part of the whole scene... They needed more defining to make them stand out so I increased the brightness slider to its maximum. This only affected the eye areas, because of the mask, and not the rest of the image.


At this stage I had saved the image as a psd to return to it later. When I opened it again I cropped in to cut out some of the left side that was not necessary or relevant to the scene, and to place the main subject, the glasses, using the rule of thirds. I then enhanced the contrast, brightness and colours overall.

Rose tinted glasses
Subscribe to:
Posts (Atom)