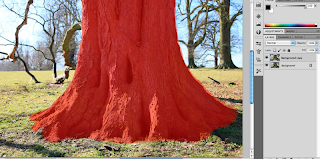
My last attempt was to use the quick mask mode again using one image:-
shutter 1/400 aperture f4.0 iso 200 FL35mm
This was my original image, taken at Calke Park (see Tree Story), in which I wanted to show the root detail of a tree. The background was a bit distracting however with a lot going on which was detracting the eye from the main subject. The light was not best placed either because I had caught the tree part in shadow, so its colours and textures were not fully shown.
I placed the image in photoshop and did layer, duplicate layer.
I ensured the default colours icon for foreground and background were set to black and white respectively. Then I hit the quick mask icon at the bottom of the tool palette (this paints in red) and chose a hard brush, and size, to paint on the red mask. I wanted to paint the mask over the main tree root subject in order to protect it from my amendments:
I used the left bracket to reduce my brush size when I got to nearer the edges and used the looking glass tool to zoom in to see how near the edges I was getting.
When the adjustments box came up I experimented with the sliders and increased the blade curvature to 61 and radius (which controls the blur extent) to 96. These gave the background a good blur and the foreground a water wave like effect lapping up towards the forefront tree root centre. It also gave a 3D sort of effect to the left roots of the tree. I accepted these adjustments with 'ok'.
That was the background and foreground sorted but the main subject could do with adjustments too I thought, so I did select and inverse and this would give me the tree itself. I now looked at the brightness/contrast and saturation levels and adjusted them to what I saw fit, with an increase to each.
The above shows the history box of adjustments carried out. I then flattened the image and saved it as a jpg for showing on my blog.
Down below
This end result really shows what I set out to take in camera...the base and root of a tree with its colours, textures, form, shape, lines and pattern. The eye is now drawn to the main subject first, and its habitat secondary.
I did later wonder if I should have included the foreground area (at the foot of the tree) in the mask, therefore protecting it from the blur... so the tree root didn't look quite so 'plonked on', but I had enjoyed experimenting with my first thoughts and liked the effects created.


Hi
ReplyDeleteYou have put in a tremendous amount of effort into this course and you have improved considerably over the latter part of the course.
You have worked very hard at your photoshop as well and it has been great to see your work getting to a higher and higher level.
The photography you have researched has influenced how you have worked over the course and you have written well within all your blogs about planning, ideas and intentions.
Well Done a distinction for both of your units!!
Steve