Another book I have studied from the college library is Landscape And Nature Photography By Richard Muir:-
by Richard Muir
This composition shows colour, pattern of the clouds and lines of the slant horizon and red flowers leading the eye from foreground through to the background sky scene. He has used the rule of thirds or golden mean to place his horizon line. The perspective shows the clouds leading the eye from the top of the frame down to meet the horizon line, and this is also met by the line of flowers coming in from through the front of foreground space.
Alive 2
shutter 1/640 aperture f7.1 iso 200 FL 24mm
I photographed 'Alive' for my Level 1 work but the sky was not a lovely blue as in this image. I returned to Calke to take the shot again on a clearer day and chose the iso accordingly. I had also wanted to shoot the tree from a different view point. I chose a mid aperture and focussed on the main tree, leaving the background to blur slightly. The composition shows colour, lines, form, scale and texture and shape. I particularly like the way light shows through the wood hole in the bottom right foreground, adding interest. Scale is shown by the main subject (the tree) to that of the small wooden branches at its feet, to the background distant trees. I chose the portrait style to show the length of the tree reaching up towards the blue skies as it appears to be looking up to the heavens. I like the shapes of the branches and thought the middle horizontal brach design looked a bit abstract. I am comparing the image with Richard Muir's by way of the deep blue sky and that the main subject stretches up both the images.

Shadows
shutter 1/500 aperture 7.1 iso 200 FL 28mm
Shadows shows my shadow taking a picture of the scene when a passer by came along with their camera also admiring the surroundings. It is as though the shadows are going to walk down the path. In reality we had both just come from that direction and I was looking back and liked the shot. The composition shows contrasts of the deep shadows, colour and lead in lines of the path taking the eye through the centre towards the blue sky background. Next time I would stop down the aperture to give more detail in the background. The image would have also been clearer had I used a tripod, but our shadows would not have the same effect. Again I am comparing the shot for the blue sky and that the eye is taken through the scene by lead in lines of the path. My focus point was on the tree at the end of the lane.
Rough Tufts
shutter 1/320 aperture f7.1 iso 200 FL 28mm
I have chosen very similar colours of green, blue and reds in all 3 above images, as in Richard Muir's and I am showing these images because they are all scenes containing blue skies. Rough Tufts shows contrasts between the trees and the tufts of grass. It was the grass tufts that actually attracted me to take the scene. Scale shows in the trees as they decrease in size from centre left to the back left, and background centre going to the right where they increase in size. Then there is the scale of the row of trees to that of the rows of tufts. Shadows and Tree Tufts were taken hand held and next time I would definately use a tripod to get a clearer image. Also I have a tendency to leave the aperture at the same stop on my travels at a same venue, so I must learn to vary it more. I have used the rule of thirds for my placement of the horizon banks. Again this was shot at Calke.
Sky Cloud
shutter 1/2000 aperture f7.1 iso 200 FL 35mm
I spotted this scene with good cloud formation on my way home from the Calke trip, and pulled over to take the shot. There was no pavement to set up the tripod so I shot it quickly from just beside the car hand held. The foreground is dark because I metered for the sky and the sun was going down behind the trees, off to the right. Next time I would stop down the aperture. Again I am comparing this scene to Richard Muir's because it contains blue sky with clouds and I have placed my horizon line in the bottom third of the frame to show the main subject (sky clouds) has right of way, just like Richard Muir's flower field, but his being the other way around.
by Richard Muir
This composition shows backlighting of the flowers, which I did with my taking of daffodils (see a previous blog). The image shows colour, tone, form, lines and pattern and has a 'happy feel' mood about it. I think the focus point was on the left pink flower as that seems to be the clearest.
by Richard Muir
This composition shows texture, form and contrast. I have showed a similar perspective shot of Lumsdale waterfall (see a previous blog). Richard Muir shows his waterfall in Black and White emphasising the rock formation with contrasting textures and tones. He uses the rule of thirds an a slow shutter to achieve the milky flow for the water, which was where his focus point was. This perspective shows the water's power and speed.
by Richard Muir
by Richard Muir
This scene of sunlight reflecting on water in the midst of woodland was something I wanted to emulate. The compositions colours are what stand out, with texture, shape and lead in lines of the water taking the eye through to the sun lit background. They eye looks straight through the scene and rests at the highlighted background.
Dusk Highlights
shutter 1/12 aperture f.7.1 iso 200 FL 70mm
I was pleased to capture the light sweeping throughout the scene just as in Richard's Muir's, and showing in the reflected water. I waited at this setting (Calke grounds) a good while before the light gave out these warm hues. I loved the colours and took the image hand held resting the camera on my legs as I sat on the bank. The ground was sloping and too unsteady to mount the tripod. Next time I would try looking for a different view point where the tripod might be safer and stop down the aperture for more clarity in the background. As it was the vivid colours that attracted me though I think it may pass as more of an impressionistic look.
by Richard Muir
This is an unusual view point to take a sunset and it is very effective... the sun just nestling on the dark silhouette of trees. I happened upon one on my return journey from the Calke outing. It was more the traditional tree sunset shot, but I was still pleased to get it:
Sunset Silhouhette
shutter 1/500 aperture f7.1 iso 200 FL 105mm
I had wanted to achieve a sun set shot with a tree silhouetted to compare to Richard Muir's. Knowing that I wouldn't be able to possibly find a scene with such an unusual perspective as his, I set my intention on finding a good tree in the right place with a similar light. I found this scene on my way home from Calke grounds and parked up at the side of the lane. I knew I had to be relatively quick as I could see the golden colours that I didn't want to miss, so I quickly set about composing the shot. I am pleased with the final result here. My focus point had been on the centre of the main subject (the tree) to create the silhouette effect with the golden light falling out towards each side. I hadn't had much time to consider the aperture and ended up leaving on the same setting I had used around Calke again. I centred the tree amidst the golden glow to show the full effect of the light, whereas Richard Muir used the rule of thirds composition. I need to remove the roving branch sticking up in the left foreground in Photoshop as it is distracting. At the scene I remember thinking if only that large overhanging branch was not coming into the frame, it would be a better composition. Now I think the opposite and consider it adds something. The scene may well have looked a little too plain without it in fact. Richard Muir's image had sparked my intention to seek out one similar and his tree is accompanied by other greeting branches, so I decided it was more of a likeness in that respect. I actually like the shape of my main tree better. I would not change anything in this image as it achieved the look I wanted. (minus the roving twig that is)

This is better with the twig removed it looks a cleaner scene.
by Richard Muir
This composition focuses on the main large foreground leaf then take the eye back leading through its habitat. Light comes in and shows on the leaves. The tonal colour mix of the green and gold leaves intertwine in the foreground floor and on the background tree. There is only 3 main colours, green, gold and brown of the tree trunk. There looks to be movement in the trees which gives a dreamy effect. Whilst I have not yet captured any dreamy tree images, my image below shows a close up of a tree stump with its habitat for comparison.
Moss Stump
shutter 1/80 aperture f7.1 iso 200 FL 28mm
My composition shows the 3 main colours green, gold and brown of the tree twigs. My focus point was on the flat part of the mosey stump. I included other tree parts and leaves to highlight the habitat I found the stump and show some shadows. I framed the scene using the rule of thirds and thought the green in the top left corner would complement the green of the moss in the bottom right corner. The twigs and shadows guide the eye through. I consider it well balanced and as I took the shot my idea was that I may use it as a crop for my close ups in theme 2. I didn't use a tripod for the image and I would next time, but I held the camera very steady. I chose a mid aperture to ensure that the stump was going to be the main focus with other objects fading off sharpness to the distance. My zoom was positioned to include all in the frame, and the selected aperture (which I hadn't changed all the day) and iso gave me the shutter speed.
by Richard Muir
Tree World
shutter 1/200 aperture f7.1 iso 200 FL24mm
These tree images show colour, shape, form, light, pattern and lines to lead the eye. I liked the curvature of the branches on the forest floor, and the reflected light and shadows when I took Tree World. This red glow light at dusk always attracts me. It gives a warm mood where as Richards Muir's image above, with its greens gives a calm and fresh mood. The compositions are similar in that the trees reach from top to bottom of the frames and show the effect of side lighting. I like the way my perspective shows depth.
Left behind
shutter 1/25 aperture f7.1 iso 200 Fl 40mm
I was really pleased to find this scene on my visit to Matlock Bath. I was attracted to the inter-twinning centre colours and pattern, and the way the scene gave a sort of impressionistic feel. I loved the fact that someone had left their black scarf hanging over the water on a twig which added interest to the composition. The overall colours are similar to both Richard Muir's above and below images and the way the light strikes the main tree connects to his image composition above. I really like the perspective in mine too, the way the bank goes up and out right of the frame, against the main tree going up and out left of it. I could crop in from the left slightly to take out the white water to make the frame edge cut into the main tree as in Richard Muir's above, but I also like its bright effect.
by Richard Muir
These compositions (above and below) show reflections, colour,pattern, shape and texture. To me they both have the 'painting' effect. The water colours attracted me to shoot this scene whilst at Matlock Bath, and as I looked out.... the small duck quickly and noisily swam out from side undergrowth. It was my focus point but it was moving so it is not clear and I did not use a tripod because I took it quickly to capture the water effects of the ducks swim. Also I was too close to the waters edge to mount a tripod from a safety point of view. A 200 iso suited the sunny conditions and I used my zoom to full capacity. The mid aperture was chosen to attempt a impressionist look because that is what Richard Muir's above image reminded me of. His image has more clarity and light where as my colours are more subdued. I see faces in the water and think it will benefit from the removal of the duck and enhancement of contrast and colours to give a little better comparison with Richard Muir's, composition wise.


This is better. I have removed the duck in photoshop: by selecting it with the marquee tool and clicking edit, fill and ok to content aware, takes out the duck replacing it with similar content in the image. An increase to the contrast and brightness sliders brighten it, but it is still not as bright as Richard Muir's so I will add more lightness and saturation in an attempt to improve it further...
Water faces
shutter 1/50 aperture f9 iso 200 FL 105mm
This is more improved, I feel these adjustments reflect better and lift it. Though now it may be brighter than Richard Muir's on the whole, producing a painted picture look. You can see the reflected trees and it is now a better representation for comparison. I have left the faces in, the most obvious being the top right background man looking over to the right.
Preparation:
My preparation for both trips out (Calke and Matlock Bath) were basically the same; ensuring a full battery in the camera with a clean compactflash card. I carried a spare compactflash just in case. I had clean equipment and carried a lens cloth in my bag. The tripod was used for 'Alive', 'Sunset Silhouette' and 'Tree World" in these cases I had more time to set it up. There are the clearer images, and therefore in future I want to use it more, with the exception of when I want the look of blur effects, and when it is impractical to do so.
Health and safety:
I am always careful not to carry too much equipment at one time, especially when I am out alone. I am aware where I place the tripod, not to upset any plants or flowers, and ensure that I only go to public permitted places in daylight hours. I handle the equipment with great care and respect, having ensured its insurance, in case of any unforeseen accidents.
Equipment Used:


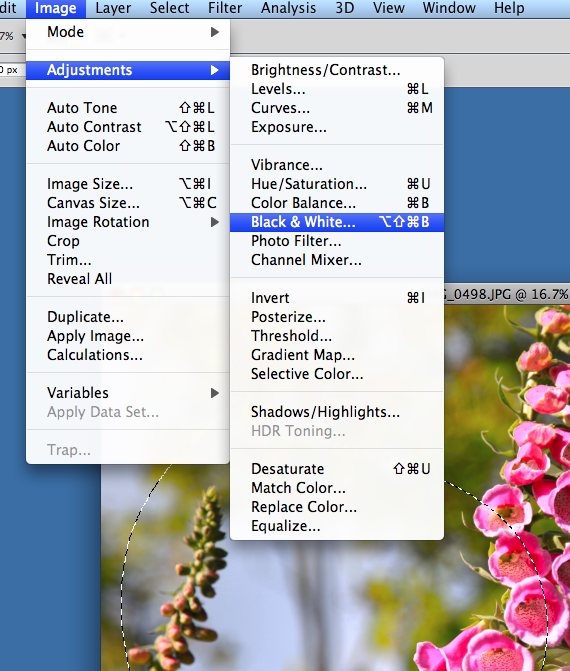
 These pictures show where I used the lasso tool to experiment to select a specific area for adjustment, changing the controls to brightness -99 and contrast 60: