Showing posts with label p1. Show all posts

Thursday, 9 June 2011

Digital Masking and Selection

I have taken 2 images to demonstrate the use of masking and selection:


The image on the left shows where I have taken part of the image on the right (a selection) and painted it onto the image on the left.  By using the healing brush tool and clicking on the daffodil yellow centre, I then painted it onto the other image... by clicking and holding down the mouse while you paint over the area you want.  The more you paint, the more daffodil appears.

These are the 2 images I started with by placing them both in photoshop


This shows the selection of daffodil painted onto the left image.

Then I looked at using the quick mask icon at the bottom of the tool box and when used this paints in red.  You click on the tool and paint over the image in areas where you want to mask, (protecting that part of the image underneath). Painting over areas in red will reveal the image below in these areas, for adjustment, then you click image, adjustments, 'revert' and it places the marching ants around the selections.  As you then use the adjustment sliders ie. brightness/contrast you see how the objects within the selections are adjusted.  You can revert back (or press Q) to change between the screens to adjust the rest of the scene, or none selections. 


You can see the painted out (masked) parts here. Any adjustments will only be applied to the other parts of the scene, once the marching ants are revealed around the selections:

You can then change settings ie. contrast and brightness to effect specific areas of the image:

The above shows all the remaining objects are selected for adjustment.

Then you can click on image, adjustments, revert, so that the selections are the adjustable areas.


Above I used a different image to experiment with masking techniques, as the screen grabs show, where I painted in red and tried some techniques:


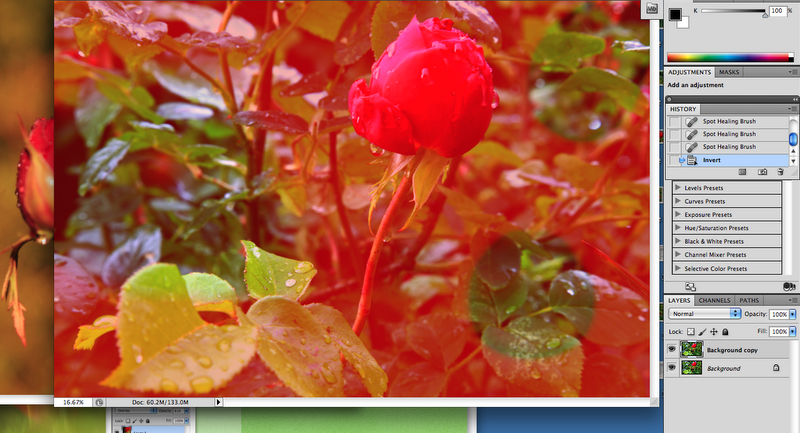

This shows how the red paint seems to seep into the backgound.


This shows how the brightness and contrast effects the selections.

You can paint over all the background so that the only selection showing is the part that is affected by any adjustments, and visa versa following the same process as described above.


You can use the 'invert' to apply adjustments to the background and not the selected painted mask area.

By inverting you effectively switching the 'viewed' selections, to either the painted top parts or the non painted underneath parts.


This shows how you can look 'through' the mask (the red painted area) to see how adjustments now effect the underneath green background selections.


Thursday, 26 May 2011

Digital Manipulation - adding a selection to an image

I took my 'Dreamy' image and experimented with blending modes overlaying the image with a selection (part of) the overall image:


This is the original Dreamy image.

I used the marquee tool to select a portion of the image, as a new layer.


Then using colour balance I adjusted the coloured sliders of the selection, as a new adjustment layer.

Taking the sliders to their extreme shows how vivid the colours become.  This is too much.

This is better.  After adjusting the sliders for colour I  selected 'overlay' in the blending modes, which superimposes the top layer onto the base layer, while preserving the highlights and shadows of the bottom layer. I also adjusted the opacity indicator.  I like these colours because it is highlighting the scene.

I am pleased with the new look.  The colours are more vivid which brings it alive, while still keeping the dreamy look.

Sunday, 6 March 2011

New Statement of Intent for new Theme 2 - The Closer View

                                                   Title of theme 2:  THE CLOSER VIEW

Intentions/purpose of the photography to be undertaken:

I intend to do 'The Closer View' of nature as my theme 2, so that my theme 1 will be an overview of nature and my theme 2 will be the Closer View of it.  The purpose is to enable me to experiment with closer photography and outline the intricate texture of nature and hopefully achieve images I will feel pleased with and are suitable for this level 2.

Reasons for selection of theme (including aspiration from the work of others):
I have felt inspired by a recent homework task set and the way it got me thinking differently about subject matter from a closer aspect.  Also whilst doing Level 1 I  found myself wanting to home in closer to texture details, like that of tree bark. A recent visit to NEC Photo Imaging course also influences my decision, together with research books.

The photo imaging equipment and medium that will be used and why:
I will be using the equipment as detailed in blog "The Kit",  as it is good equipment and I can get in quite close with the lens I currently have.  However I do not rule out the fact that I may want/ need another lens in the future, whether it be a prime closer one or macro, we shall see.

Techniques that will be used to convey the visual message:
I will be experimenting with subject matter and controls of my camera and equipment to get in closer than my images for theme 1. I may do a full view of a scene for theme 1, and then take some details that comprise that scene to home in close on for this theme.  I will be checking the results on the computer once I have taken the shots.  I hope to learn as I go along within this new area, purchasing any new equipment as and when, if necessary.  I will be looking for cameos to photograph  for this theme during times out taking photos for theme 1.

How light quality can be used to help convey the visual message:
I plan to use ambient light and no flash, mostly daylight hours,  adjusting camera controls accordingly to achieve best effects.  I may add more lightness in photoshop, post capture, if necessary.

Safety considerations:
 I will be careful with my equipment and its handling and not try to carry too much equipment at any one time.   I will follow any rules of grounds that I may visit.   I will keep all my equipment dry if caught out in bad weather.  I will not stray too far off the beaten track when alone and will always carry a mobile phone.

Thursday, 24 February 2011

Digital Manipulation - Minky

I took this shot of Minky my cat outside in the garden during October last year.  Though I liked the image, I thought the background was a bit distracting and so used the image as an overlay of 2 images as part of a task in my Level 1 work.  Now I have come back to the original image for  Level 2, I have deleted the distracting background and tweaked the brightness/contrast controls in photoshop:-

                                                                       Wild Minky
                                   aperture f5.6 shutter 1/3200 iso 800 focal length 90mm

I used the clone tool to make the background completely black,  by using quite a large heavy brush, because I was covering a large black area. I clicked on the top right of the image, to pick up the black colour on the brush, then proceeded to  brush over the coloured background, top left. As I worked I switched to a smaller brush when getting lower and near to the cats outline, so that I did not mix, or catch the cats colours on the brush.

I have given the image a full black background to make Minky look more dramatic. I had prepared by going into the garden with my camera and watched and waited until Minky was doing his own thing. He laid down and was reaching over to groom his fur.  He has a  trait of stopping mid way and just  gazing, so here I seized the moment.  With his fixed look and colours he emulates a wild cat to me, though in reality he is very soft and loveable.  I got in as close as was comfortable, on his level, without making him turn to look at me and with the camera set to aperture priority because I had to be quick, and I only wanted him in focus,  I ran off this image, among others.  The daylight was good I thought, coming from the left behind me, it seemed to be shining on and highlighting his facial features well.
I consider the manipulated image to be big improvement on the original.

I had taken the original image in file format 'jpeg' and presented it on my blog.

Sunday, 20 February 2011

Assignment 206 Statement of Intent for Theme 1

For my first theme I have chosen 'Nature'.

                                              The title of the theme is:  ITS ONLY NATURE.

Intentions/purpose of the photography to be undertaken:
I want to further my Level 1 work shooting photographs on location when out and about.  I enjoy walking around nature type areas, I find it relaxing, so will focus on this.  I will be looking in National forest enclosures for anything that catches my eye, from a scene, an animal, a tree, a leaf, water or any mixture of such things.

Reasons for selection of theme (including inspiration from the work of others):
I enjoyed my Level 1 work in Landscapes immensely so want to continue on a similar theme with a hope of progressing.  I feel I need more time in the field to practice technique and manual controls of the camera.

Again I will look at the work of Art Wolfe amongst others.  Here are some more of his inspiring pictures:

                                                                 taken by Art Wolfe

                                                                  taken by Art Wolfe

                                                                  taken by Art Wolfe

                                                                  taken by Art Wolfe

                                                                 taken by Art Wolfe

                                                                   taken by Art Wolfe

The Photo Imaging Equipment and medium that will be used and why:-

Canon EOS 5D Mark II EF24-105L IS USM kit
SanDisk Extreme CompactFlash card 8GB 60 MB/s
SanDisk Ultra CompactFlash card 8GB 30 MB/s
Tripod
Mac Computer with Photoshop CS5

I will be using this kit because I have enjoyed its results so far and want to experiment more with it.  I have found the lens to be versatile.   I will need to add a shutter release button.  I would also like to experiment with an ND graduating filter.

Techniques that will be used and how they will help convey the visual message:

I will use a range of controls on the camera to experiment.  I will take many shots to enable me to pick out the best.  I will analyse the images on the computer later,  to determine the need to return to a scene to re-shoot it differently/ better.  Post capture I will tweak images in Photoshop using controls to make them brighter/lighter and change contrast/colours controls.

How light quality can be used to help convey the visual image:

I will use natural light as I do not yet have a flash.   Again I will look for bright conditions, not necessarily sunny, just good enough light for the scenes to look well.

Safety Considerations:

I will becareful where I go and not stray too far alone.   I will take care of my equipment and its set up.  I will wear good walking footwear and not try to carry more than is comfortable for too long.  I will try to take the car as near as I can to a scene shoot.